

| You are currently not logged in. Logon or register to access more features. Vision-Riders.com is a FREE service provided by Victory Riders Network. | |
|
| |
 Upgrading Speakers and Adding an Amplifier Upgrading Speakers and Adding an AmplifierJump to page : 1 Now viewing page 1 [25 messages per page] | View previous thread :: View next thread |
| Discussion -> Vision Tech Reference | Message format |
| Dain |
| ||
Cruiser Posts: 144 | Here are the speaker and amp upgrade instructions for all that want them. It took me so long because I had problems at first with the setup and wanted to be sure it was right before posting and it was a simple fix. Then good weather took over and well, riding came first. I don't have but 2 pictures for you so far, sorry but will explain in detail on how to do it at a cost of around $300 not six to eight hundo and not only front speakers but all 4 speakers. This is a 4 speakers setup and it kicks hard. Now I want you to know I am a sound man. I have a DJ bus. and have been in and out of bands for over 32 years. So I know how to hook up all types of sound audio. If you want to do this then good and if you don't please don't discourage others not too if they are set in doing so. Its not easy but its not all that hard either. Please read all the instructions before begining to do anything to your bike as to make sure this is what you want. As for me I like my music loud and being a DJ and also battling deer on my way to work, so this lets them know I'm coming, this is what I wanted. I must also add no Visions were killed or injured during this audio transformation. 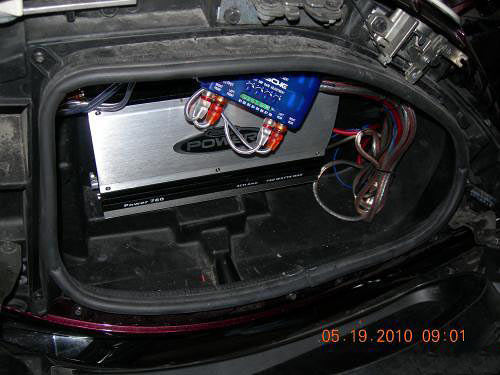 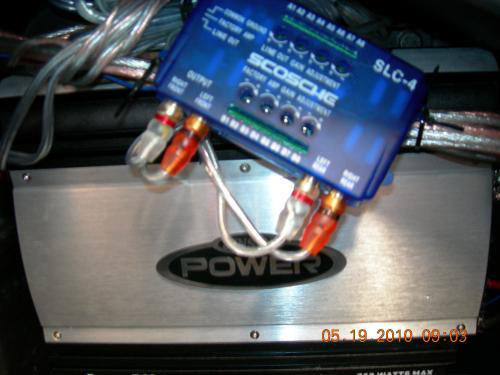 I have the pictures of the amp and line level converter but lost the others. I will add more if I can to this post later. Now for the instuctions: 1). You must remove these items off the bike. Dash cover, front speaker covers mirrors and speaker enclosures, front accsess pannel, center consol, seat and cheese wedge, rear speaker covers and pass backrest, front and rear speakers. And turn the radio all the way down and turn the speed av to nothing. 2). Remove the front speakers and take note of the pos. and neg. speaker leads for use later. I used Infinity speakers because they have a larger speaker area then others and are great speakers, but as with most bigger speakers they don't fit right in the enclosures. So I have read that some made spacers and thats too hard for most to do and I didn't like that so, I removed and then modified the enclosures by setting the speaker in it and rubbing it back and forth then take it out to see where the speaker hits (2 spots). Then I took a small propane tourch and heated the inside of that area real good and made it soft enough to use the handle of my hammer and push out the spot where the speaker hits, do this while the enclosure is laying on the ground. The first side took a while and the second I got it the first try. Don't worry if you poke through the plastic because you can use silicone on the outside to fix and seal any open spots. Once you get the speaker to almost fit flush in the enclosure(about 1/8 inch gap is close enough) your good. But don't put the enclosure back in as of yet. 3). Routing the wires. I don't know about the hawg kit but I know it say's its a plug in system. But I tell you, If they use the same speaker wires for anything other than stock it will sound like crap compared to this. You must use 50ft of 12 awg and 50ft of 16 awg speaker wire and what you want to do is cut 2 15ft lengths of each both 12 awg and 16 awg and then cut the remainder in half. You will need to put conectors on the 12 awg ends that are going to the speakers but not to the amp ( they have slots on the amp for the speaker wires). Now rout them into the enclosure first then put the enclosure back in the bike leaving enough wire to hook to the speaker. Now cut the ends off the orig. speaker wires and splice in the 16 awg wires to them with conectors and they go to the in line converter( thats later). Rout the wires together right and left ones that go to the amp and ones that go to the in line converter ( marking the right side with tape so you know which is which later right and left ) go from the front so you can wire tie them at a point just under the dash where they are almost out of sight and run them down along the left side on top of the frame. As you go you can use wire ties and attach them to the wires that already run that way. Take them all the way under where the seat would be but be careful not to place them under where the seat meets the frame or you will pinch them. Rout them to the left saddle bag side, as you must drill a hole big enough for all the wires to fit through speaker and power wires about a 1 inch hole (you can find a grommet at the auto store). If you are lookig at the inside of the saddle bag at the top left after the bend starts down toward the rear is where you want the hole which will be under the seat area. With the the back speakers out leave 6 to 8 inchs of the 12 awg wire hang out of the speaker holes. Put conectors on those ends that will go to the speakers and run them to the crossover networks supplied with the back speakers and the crossovers will fit in the empty space under the trunk compartment so just wire tie them in there after you hook the wires from the back speakers and the rest of the 12 awg wire that will go to the amp. And rout those wires to the hole along with the other wires. And do the same with the orig. rear speaker wires as you did with the front and run them down along with the rest. The power wire (red or + side) will also run along with the speaker wire from the front but will attach to the battery with a fuseable link in between and will meet up with the speakers wire where the wire meet the frame and run along with the speaker wires from there. Now there is also a second red power wire that must be put in for the amp. The amp has 3 power wires 2 red and one ground. The second REM is a smaller wire and can be 16awg also but not speakers wire. It will run from the rocker switch you will install in the extra slot on the consol. You can get a rocker switch that looks pretty close to what is there at the auto store or Victory sells them also. Now with the rocker switch in place, splice in to the hot side on the caution lights right next to this rocker you just put in. Use a test light and turn the key to acss. and find the hot side of the caution wire but don't put on the caution lights while doing this. Hook that to this new switch and run the other side from the new switch back along with all the other wires and it will go to the REM on the amp. This wire does not power the amp it only tells the amp to power on, so that it doesnt come on all of a sudden. The ground wire will hook up to the computer box ground that is under the seat and will go through the same hole as all the rest of the wires. The next thing is the cpu case fan, You will get that from Newegg.com get the Vantec TD8038H 80mm it will keep the amp cool in the saddle bag. If you are in cooler temps area you may not need it but in 90 plus its a must. It will mount just below the wire hole and closest to the opening on the flat spot of the side of the saddle bag toward the front. You must drill a bunch of little 3/16 holes in the side of that area for hot air to get out. And bolt the fan to the side on the inside of the saddle bag. Then run the red 16 awg power wire from the fan to the red side of the heated seat wire and splice into it. The ground will go to the amp ground. Now you will pull all that wire through what seems like the smallest hole ever now, but if you do it one at a time it will go. The wiring is the worst part and I tried to be as detailed as posible, so for some it might seem like to much info but for others it makes a wold of difference. 4). Mounting the amp. This amp just fits in the saddle bag like it was made for it. If you look at the first picture you can see its up on that little bump at the back of the bag. Put it up against there and mark where the 1/8 inch holes need drilled to mount it. And then drill the holes but dont mount it yet. Next take the wires that you ran from the orig speaker wires and conect them to the in line converter by following the instucts for the converter. You will get that from amazon. You will turn it all the way up on the converter. Next the rca cords attach them from the converter to the amp and the ground will also go to the amp with all the other ground wires. Hook up the rest of the wires to the amp. where they are suppose to go ( follow the amps owners manual). Now with every thing hooked up lastly being the main power lead, then put the fuse in. Turn on the radio and make sure before hand that it was turned down first. Turn on the roker switch and turn up the levels on the amp turn them to max, turn the base half way and leave the others down. Now very slowly turn up the radio one notch at a time and see if it is playing on all 4 speakers and if it is then turn it down and everthing off and mount the amp with small screws in the saddle bag and then try it again and make sure all is still working after mounting the amp. Hook the ground from the fan in last after the first test because it is loud. Well thats it I will get more pictures uploaded and if you have ant Q's just ask. I know it looks like alot but its not that bad. It took me about 3 hrs total and is well worth it at only $300. Here is a list of everything needed, 5032cf Infinity front speakers 5.25 $60 Pyle plg5c speakers $37 Jensen 760amp $69 Scosche SLC4 speaker level converter $23 And about $100 for the rest, 50ft each of 12awg 16awg speaker wire and 16awg power wire and 10awg amp wire kit, wire conectors, screws, wire tester. (ec1cb87e70e4cd89a92d3dec82548557_150[1].jpg) (4e2ed9dfbda356c584024442245bbd1a_150[1].jpg) Attachments ----------------  ec1cb87e70e4cd89a92d3dec82548557_150[1].jpg (4KB - 63 downloads) 4e2ed9dfbda356c584024442245bbd1a_150[1].jpg (4KB - 34 downloads) ec1cb87e70e4cd89a92d3dec82548557_150[1].jpg (4KB - 63 downloads) 4e2ed9dfbda356c584024442245bbd1a_150[1].jpg (4KB - 34 downloads) | ||
| |||


| Jump to page : 1 Now viewing page 1 [25 messages per page] |
| Search this forum Printer friendly version E-mail a link to this thread |
| Copyright © 2007-2025 Victory Riders Network™ |